Knowing how to braise is a cooking skill that’s widely misunderstood. Knowing WHAT to braise is even more confusing to most home cooks. I’ve taught this subject many times in my videos, as part of the curriculum in my web cooking classes, and on “Burn Your Recipes”, my cooking DVDs.
Now, it’s time to end any confusion about this ignored way of cooking because I’m presenting the information to tomorrow’s chefs. Our braised food will be served by the companion hospitality class in the school’s dining room in an ‘a la carte’ style. This means they’ll be bringing us restaurant tickets like real waiters and waitresses.
Braising is a combination cooking method. In a previous class, “How Does Food Cook”, we categorized all cooking methods as either conductive or convective. Heat is applied either directly to food or indirectly through air or moisture. When you braise something, you’re using the best of both methods.
The first step in how to braise something is choosing the correct item for this type of cooking. Generally, the toughest, chewiest cuts of meat are braised. That’s because the very long cooking times, moisture and acidic environment have a tenderizing effect that no other way of cooking does.
It doesn’t make sense to try to braise filet mignon or a flounder filet, they’re already tender. Items like those should be grilled or sautéed because of the quick, intense heat. The perfect item today’s lesson would be tough beef cubes, veal shank, or tongue. We’ve decided to make Beef Bourguignon and Chicken Cacciatore.
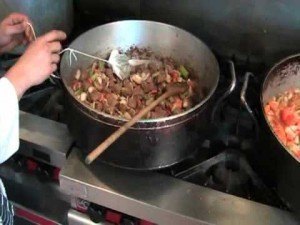
How To Braise Anything:
1 ) Coat the item in flour – By using a starch to coat the item, you help thicken the final pan sauce.
2 ) Pan Hot First – Just like sauté method, sprinkle some water from your hands and when it sizzles, the pan is ready to cook.
3 ) Fat Hot – Add some type of oil and heat until it changes from smooth to striated, just before the smoke point.
4 ) Add the protein product coated in flour – Don’t crowd the pieces and don’t poke or push them around. Leave them alone.
5 ) 75% / up to 25% – Cook the item 75% on the first side so you can observe the changes in color, moisture, and texture. These are indicators of how much it’s cooking. If you turn it too fast, you lose these visual cues.
6 ) Deglaze – Add wine to lower the temperature of the pan, and begin combining with the roux to thicken the pan sauce. Reduce the liquid until the wine is almost gone.
7 ) Stock and aromatics – Add a flavorful liquid like chicken or beef stock and chopped vegetables to the pan along with an acidic ingredient like tomatoes or vinegar to aid in tenderizing.
8 ) Low and slow – The key to braising is cooking very slowly for a very long time. Reduce the heat to a very soft simmer or poach with no visible bubbles. Leave it alone because 5 to 8 hours wouldn’t be unusual for cooking something this way.
When you know how to braise something correctly, you can actually save a lot of money. You can buy less expensive cuts of meat and create delicious, tender morsels because of your cooking method skills. You can also save time, because the more you ignore it, the better it gets. You can’t walk away from a sauté pan, but you can walk away from a braise and be very pleased when you return.
Discover the difference between how professionals and home cooks are taught in my next
FREE Webinar Workshop
Claim your FREE Spot for the next webinar session by CLICKING HERE

Hello chef,
Can I braise chicken? And how do I get the most flavor
Hi Robert!
Of course you can braise chicken. You can braise anything you want once you know the cooking METHOD. All of cooking comes down to repeatable, dependable, reliable cooking methods. When you can repeat the method, then you cook the ingredients YOU want.
Your question about how to get the most flavor from your cooking is exactly what we examine very closely in WebCookingClasses. You always get the most flavor when you; 1) use the most flavorful ingredients. A local farm-raised chicken will taste better than a Perdue styrofoam tray with blood absorbing pad chicken; 2) use a dependable cooking method because HOW you transfer heat to food brings out the flavor; 3) know the difference between herbs and spices, WHEN to add them in cooking, how much to add, and in what combinations. That’s how you get the most flavor out of saute, braising, stewing, roasting, smoking, pan frying, steaming, simmering or poaching. They’re all dependable cooking methods.
Grandmother used to use a very similar method and it works just great. Carrots, irish potatoes, onions and sides were Italian or poll beans and good ole rice and of course the gravy produced by the roast.
Grandma always knows best, Bob.
I’d like you to clarify the braising process when using a larger chunk of meat, say… a 3-pound chuck roast.
I’m used to searing the roast on all sides first, then adding liquid and vegetables and covering the pan with a lid. Obviously I am unable to watch a chunk of meat cook until it’s 75% cooked, flip over and cook with the lid on for the moist cooking process. That would take HOURS for the meat to cook to 75% on one side. Your video works well for cubed pieces of meat that are coated in flour, but braising a larger chunk of meat will require a slightly different method (I should say process, since the method would be the same) in order to obtain the desired results. After the meat is done cooking (thermometer!), I add a slurry to create the pan sauce as the meat rests.
What are your thoughts on this? (Just curious)
Hey Ward!
That sounds more like the Pot Roast my Grandfather used to make. He’d take a chewy piece of meat, sear it in a large stock pot, add a bunch of veggies and broth, cover the thing and leave the house!
A three pound chuck roast does sound too big to braise. The main benefit of braising is to tenderize a tough piece of meat. Even if you cooked a three pound roast for two days, I’m still not sure it would “fall apart” under a fork like a well braised item should. Sounds like a long low and slow roasting process is in order for a larger piece of meat.
However, if you MUST braise a large cut, quickly sear it on all sides, then it should be in a deep stock pot and still must be covered at least 50-75% with liquid that has an acidic ingredient. I don’t know how long that would take to have it tenderize, perhaps more than 24 hours.
Once the wine has one what liquid is left to allow the braise to be on heat for several hours without drying out or burning?
With thanks,
Burt McCarthy.
Hi Burt!
Generally, stocks or broths along with an acidic ingredient are used after the wine is reduced. Then, it’s “low and slow” cooking to tenderize.